We have a limited number of boots available this winter, so order before they're gone!
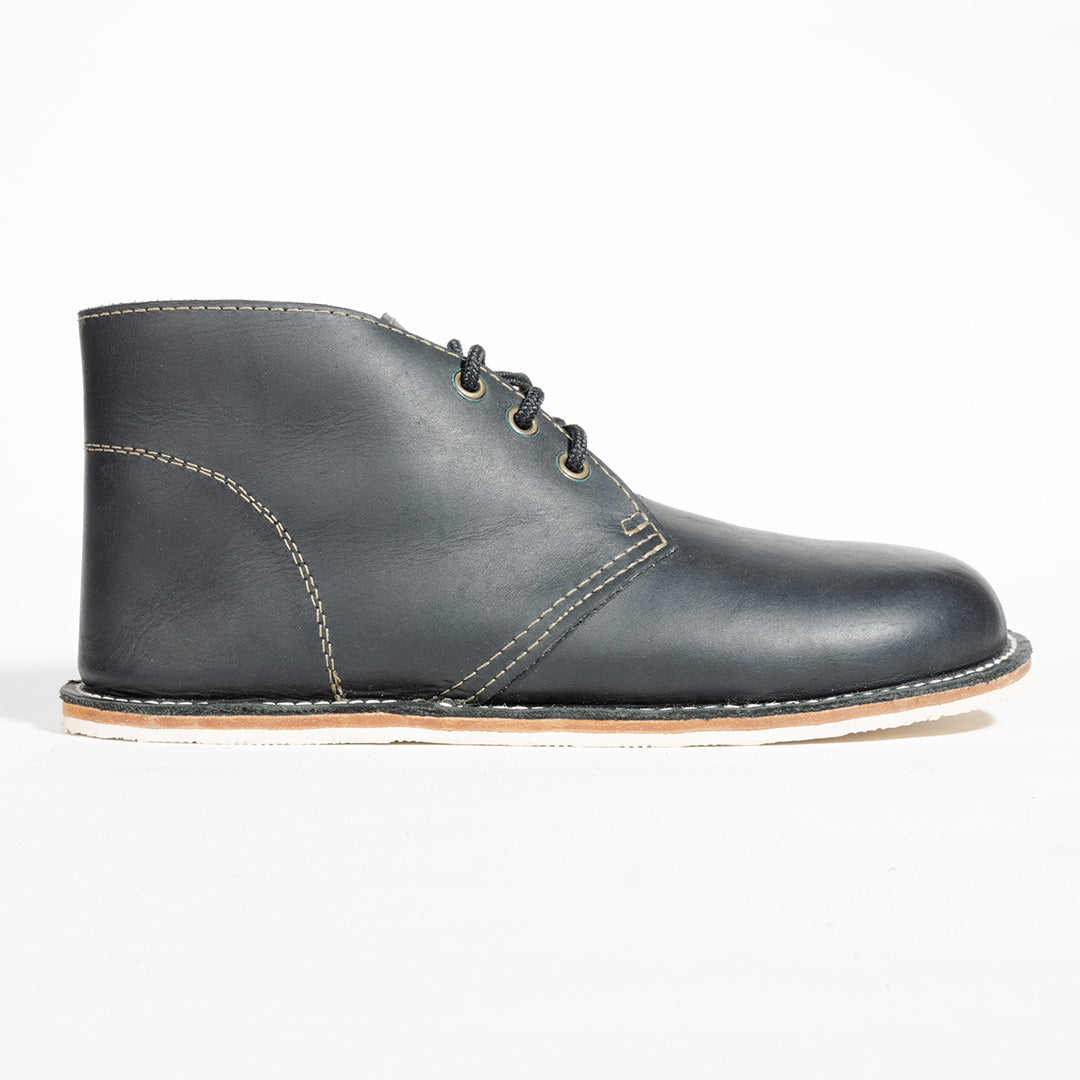
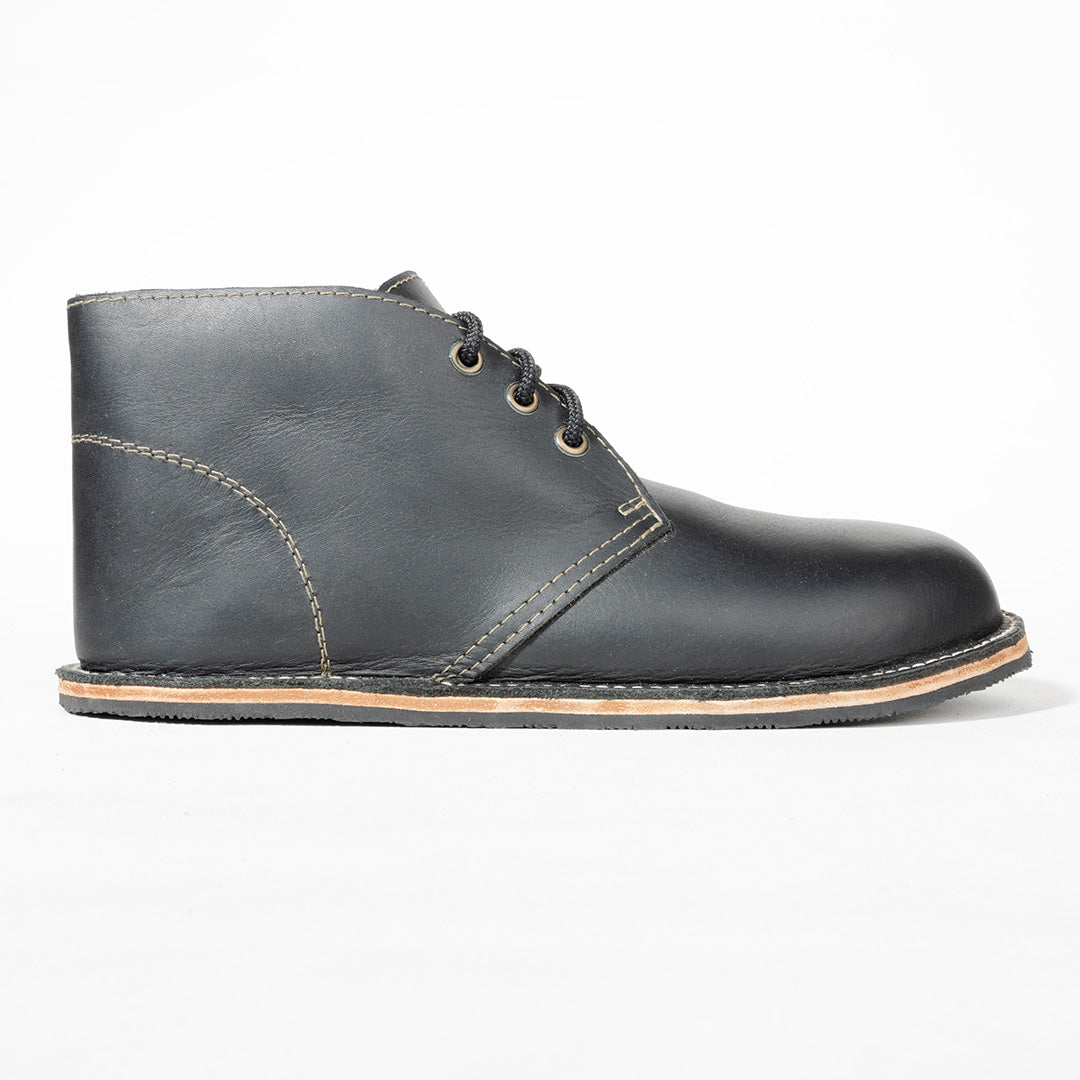
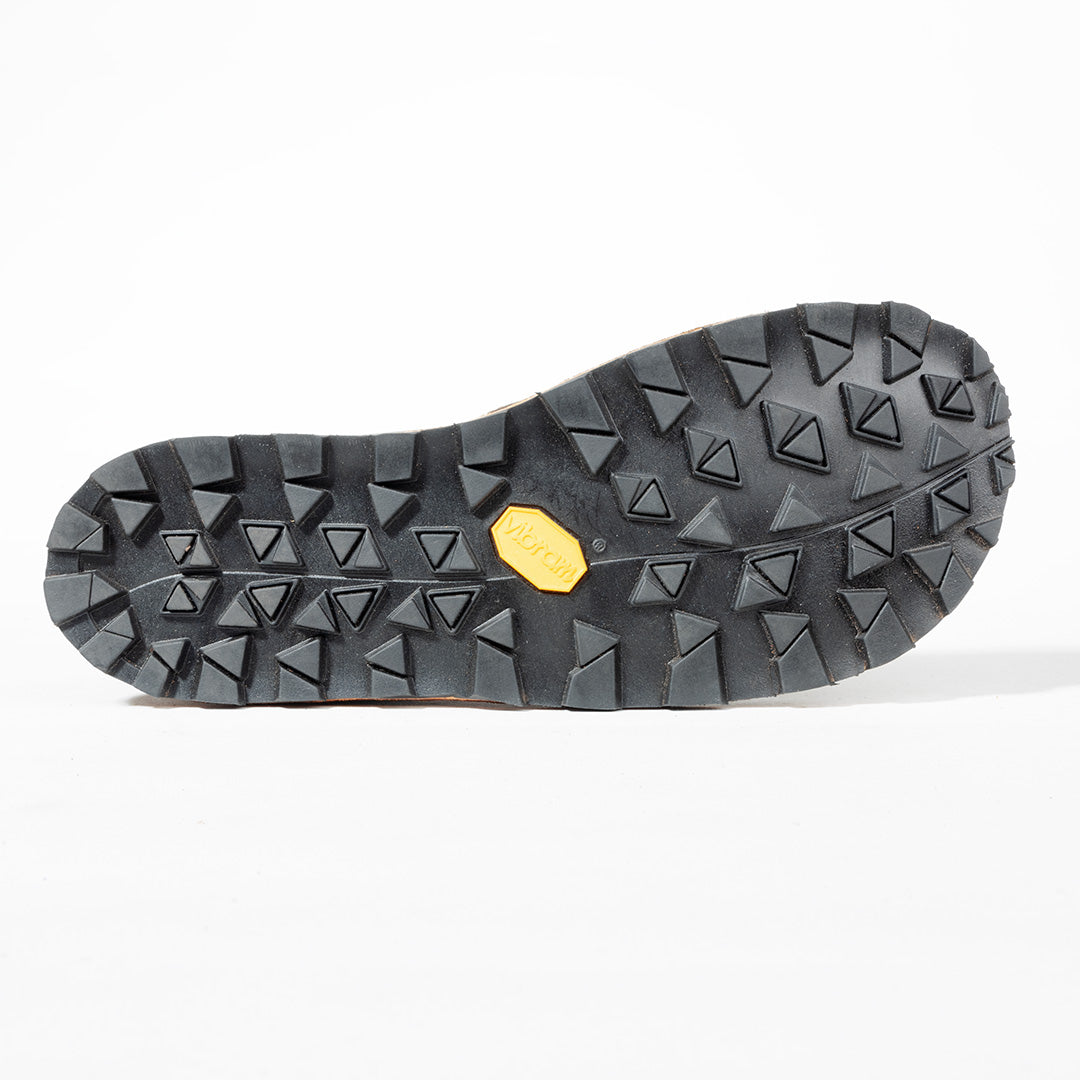
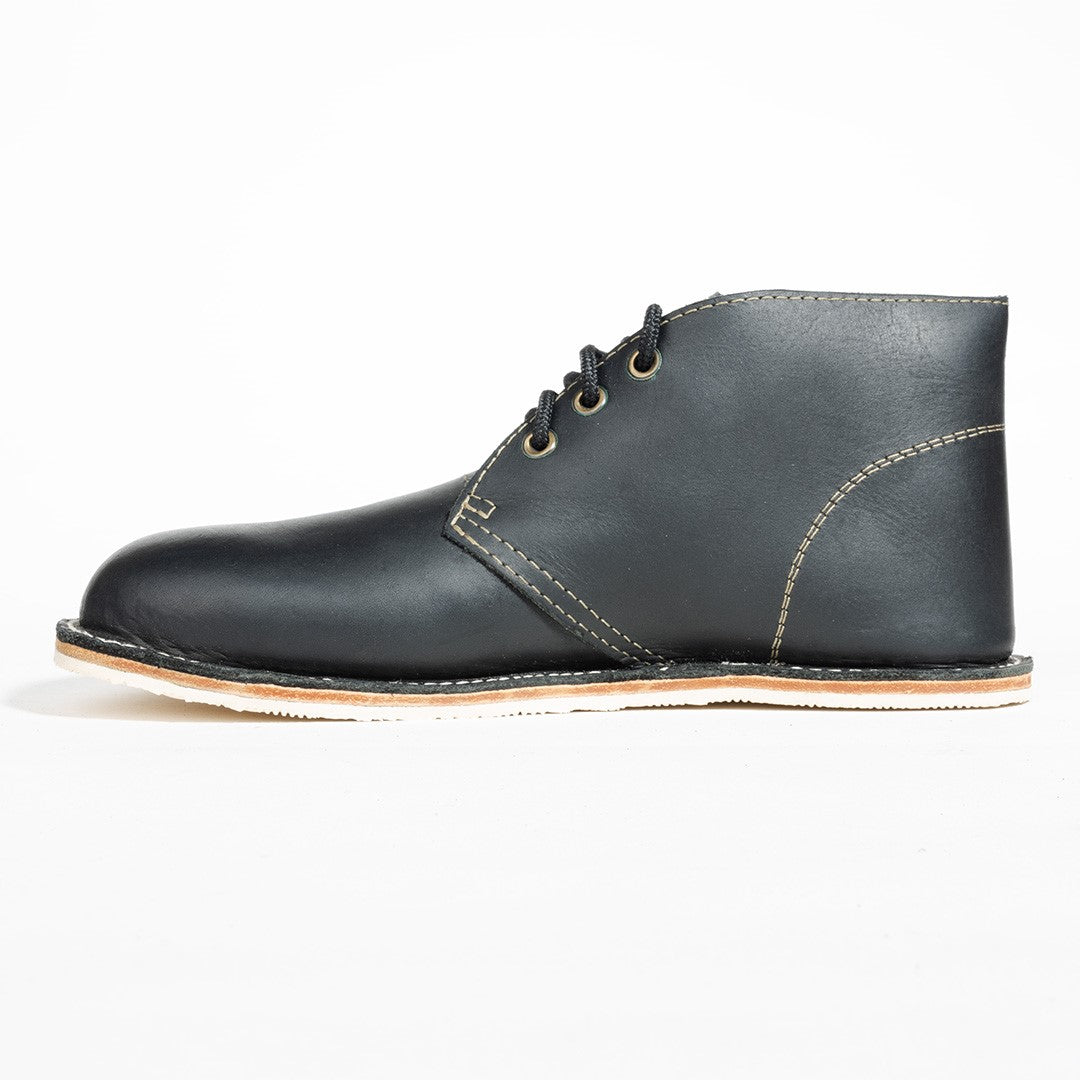
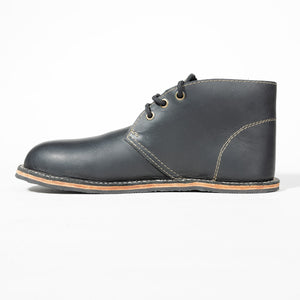
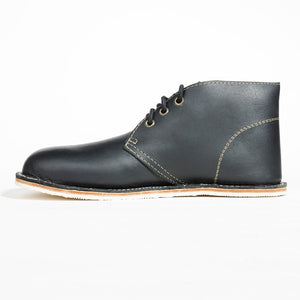
Wilder boots have the barefoot features you demand (zero drop, foot shaped sole, no arch support and minimal 10-12mm stack height) with the quality and style you expect from a handcrafted stitch down construction boot. We use only the finest 5.5 oz American oil-tanned leather and rugged Vibram soling material to construct our Wilder boots! Our boots ooze quality and craftsmanship because each one is hand cut and lasted here in our Santa Cruz workshop. Discover unparalleled quality and style for your barefoot needs
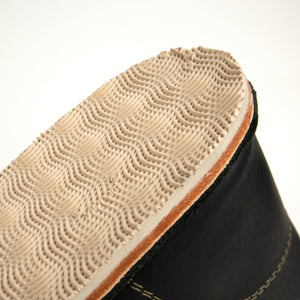
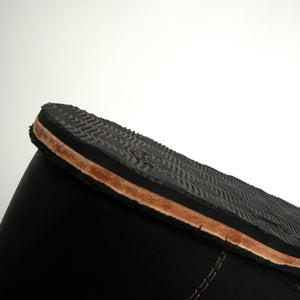
Full-grain, American oil-tanned black cow leather creates a durable and stylish construction, while the partial lining made from chrome tanned cowhide provides softness and comfort for the back of the heel and top of the foot. With three sole options customization is easy to achieve the perfect balance of form and function! Held together with a stitch down construction, the Wilder will keep water and other elements out easily, while still a timeless look and feel that can easily go from the trail to a night on the town! Order the Wilder boot today!
Please note: Processing time for the boots will be 3-4 weeks from time of production.
We are not currently accepting custom orders for the boots at the time, boots are only available with the sole and leather options below, in our standard boot design shape.
For sizing order your standard shoe size
Key Specs
›
Barefoot features:
Zero drop
Ample toe box
No arch support
10-12mm total stack height (total sole thickness) depending on sole choice
Leather Materials:
Upper: 5.5 oz Full-Grain, American Oil-Tanned Cow Leather
Vamp Lining + Heel Counter: 2.5 oz Full Grain, Chrome-Tanned Cow Leather
Construction:
Stitchdown
Structured:
Yes (with celastic)
Stack height:
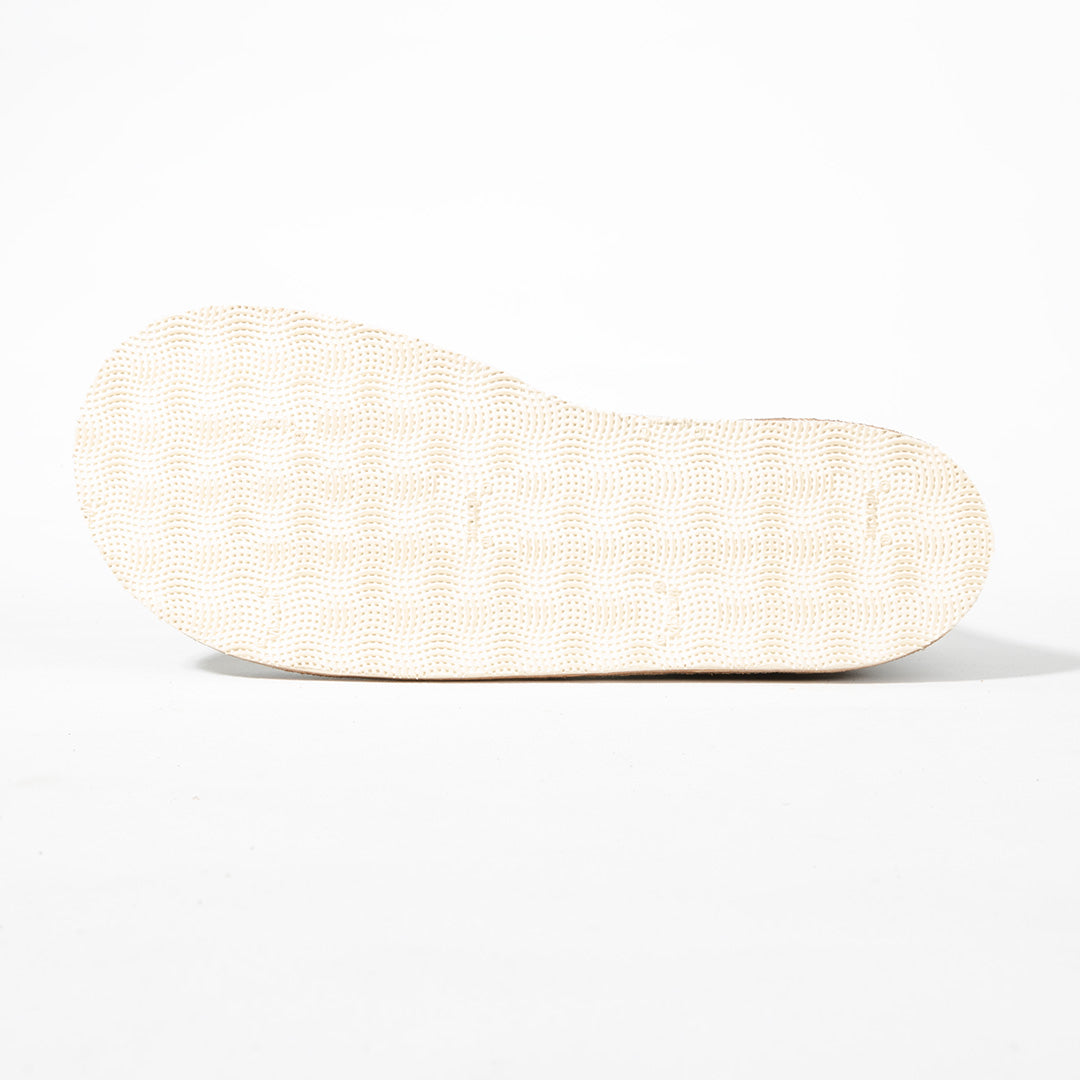
Insole: 2.8mm Veg Tan Leather
Midsole: 2.8mm Veg Tan Leather
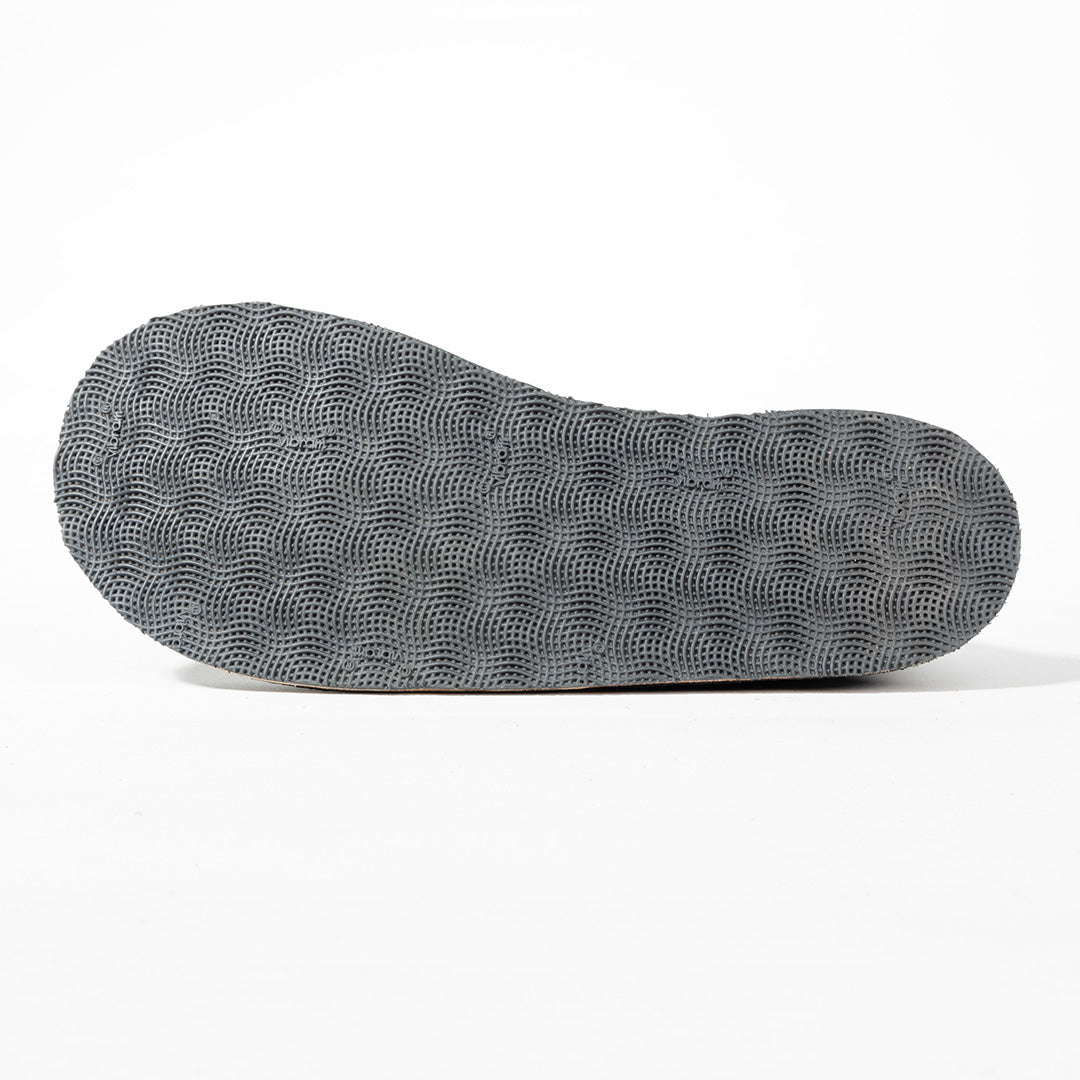
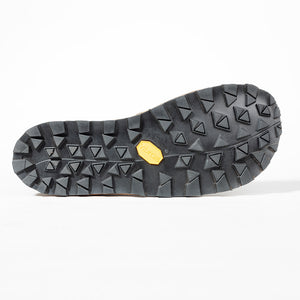
Outsole: 4mm Vibram Cherry or 6mm Vibram Zegama (Megagrip)
Total Stack Height: 10mm Cherry, 12mm Zegama (Megagrip)
Weight:
~26.5 oz for a size 10 pair (please note, weight is subject to change depending on each individual boot
Sizing:
You should pick your standard US Men's street shoe size for your boots. For help with sizing and to double check your size against our templates please visit our Sizing Guide page. Feel free to reach out to us via email contact@shammasandals.com for sizing questions as well, and we would be happy to help you out!
Made in the U.S.A.
Shipping + Returns
›
Shipping:
UPS: $12.99 for shipping within the US
UPS: $65.00- $75.00 for shipping internationally
Returns:
We accept returns of boots in new condition within 30 days of boot delivery. Return packages can be postmarked on the 30th day from delivery. Boots that are worn or damaged in any way that is not a manufacturing defect will not be accepted for return. Please see our full Return Policy here.
Exchanges:
We accept exchanges of boots in new condition within 30 days of boot delivery. Exchange packages can be postmarked on the 30th day from delivery. Boots that are worn or damaged in a way that is not a manufacturing defect will not be accepted for return. Exchanges may have a 3-8 week processing time due to the handmade nature of the boots. For help with sizing before you order, please reach out to us at contact@shammasandals.com.
Customer Reviews
5.0Based on 3 Reviews
5 ★
100%
3
4 ★
0%
0
3 ★
0%
0
2 ★
0%
0
1 ★
0%
0
Customer Photos
Write a ReviewAsk a Question
Reviews
Questions
Thank you for submitting a review!
Your input is very much appreciated. Share it with your friends so they can enjoy it too!
These boots are exactly what I needed for colder weather. I went up 1/2 size for heavy wool socks. The regular sizing would have been great for regular to medium weight socks, but I intended to use these in cold weather so the extra size worked out perfect. Yes, they are a bit pricey, but worth every cent for good feeling, good looking, hand-made boots. Next year I 'll probably add a brown pair if they become available. Don't miss the opportunity.
So, I bought a brown pair initially. There was a slight QC issue with the boots that Shamma went above and beyond to correct. After all; aren't we all buying these boots with an eye on them being a lifetime boot?!?
Well, now I've got the original brown pair, *plus* a black pair...
The leather on these boots is absolutely buttery-smooth and soft. The build is solid. These are the boots you're looking for.
As for sizing, the boots are definitely for high-volume feet. I sometimes put a very thin insole in when wearing thinner socks, just so I'm not sliding around too much in them. I have a size 9 (I have a size 8.5 in Shamma sandals, but my feet go literally right to the end of the sandals), and could *possibly* have gone with an 8.5, if I was fine with never wearing some big chunky socks.
TL;DR Buy a pair of these boots. I bet you'll also get the other color, eventually!
My new favorite boot from my favorite sandal company!
I am a long time wearer of Shamma sandals. I have the Trail Star Alpha, the Numa Warriors, the Elite Ibex, and have gone through several pairs of the venerable and untouchable Elite Warriors in leather and Ultragrip. I am an avid outdoorsman hiker from the southeast and these are my daily driver footwear for nearly 5 years now. During the winter, there comes a point when I have to reluctantly hibernate my feet into something with closed toes, so when the Wilder boot came out I was instantly interested. Let me tell you, they do not disappoint! Saying they are solidly made is an understatement. The craftsmanship in these is top notch! The stitching is superb and the leather is thick and durable. I chose the Ibex soles because I love it on my hiking sandals for the sure footed nature it provides you. Being a boot, there is a good chance they will see inclement weather at times. They are able to be dressed up or down, and they are beautifully made. I have narrow feet and wide toes and the fit throughout is excellent! If you’re an avid Shamma fan like me, the same size in the sandals will make the boot fit perfect! Couldn’t be happier with my purchase!
J
James K.
Grrreeaaatt!!!
These boots are exactly what I needed for colder weather. I went up 1/2 size for heavy wool socks. The regular sizing would have been great for regular to medium weight socks, but I intended to use these in cold weather so the extra size worked out perfect. Yes, they are a bit pricey, but worth every cent for good feeling, good looking, hand-made boots. Next year I 'll probably add a brown pair if they become available. Don't miss the opportunity.
A
Andrew F.
Perfection!
So, I bought a brown pair initially. There was a slight QC issue with the boots that Shamma went above and beyond to correct. After all, aren't we all buying these boots with an eye on them being a lifetime boot!
Well, now I've got the original brown pair, *plus* a black pair...
The leather on these boots is absolutely buttery-smooth and soft. The build is solid. These are the boots you're looking for.
As for sizing, the boots are definitely for high-volume feet. I sometimes put a very thin insole in when wearing thinner socks, just so I'm not sliding around too much in them. I have a size 9 (I have a size 8.5 in Shamma sandals, but my feet go literally right to the end of the sandals), and could *possibly* have gone with an 8.5, if I was fine with never wearing some big chunky socks.
TL,DR Buy a pair of these boots. I bet you'll also get the other color, eventually!
You may also like
Thinking of transitioning to barefoot running?
Sign up to get your free Barefoot Transitioning Guide, created by PhD Mike Prevost.
Sizing Chart and Adjustment Guides
SANDAL SIZING CHART
We strongly recommend using the templates to check your foot size to ensure a perfect fit!
NOTE:Make sure your printer doesn’t resize or shrink to fit when printing! You can check if the templates printed to scale by measuring the printed ruler on the page with a ruler or tape measure. Larger sizes will need to be printed Poster across 2 sheets of paper. You can download the free version of Adobe Acrobat PDF Reader and print the templates in the "poster" setting. This should print to scale across two pages.
Shamma Sandals use custom soles that are designed to give you the best possible fit and experience, so please check your measurements with our sandal sizing chart. The templates of the sandals are available for download and printing.
To size yourself, print the template out and place your foot on the template so that the toeplug hole is between your big toe and first little toe. Make sure that your toes aren’t hanging off the front of the template, and that your ankles line up with the ankle slots on the sides of the sandal. If the ankle slots are under your foot a little bit, that’s ok, the laces come up and around your feet – just make sure that your toes don’t go past the front of the sandal, that your heel doesn’t go past the back of the sandal, and that the toe hole and ankle slots line up with your feet. For the best fit, we recommend choosing a sandal size that gives you between an 1/8" (3.18mm) to a 3/16" (4.76mm) of extra room in front of your toes and behind your heel. Thus, we recommend getting sandals that are 1/4"-3/8" (6.35mm - 9.53mm) longer than your foot.
If you don't have a printer, you can measure your foot according to the instructions in the video above (Episode 4) and compare those measurements to the sandal measurements on the chart above and choose a size that is 1/4"-3/8" (6.35mm - 9.53mm) longer than your foot. You can also send your foot measurements to us at contact@shammasandals.com and we would be happy to recommend a size based off of those measurements.
BOOT SIZING CHART
For boot sizing, you can generally go with your standard street shoe size.
NOTE:Make sure your printer doesn’t resize or shrink to fit when printing! Check the measuring line of the template to a physical ruler before sizing! Larger sizes will need to be printedPosteracross2 sheets of paper.
Shamma Size
US Men’s
US Women’s
Insole Length (Inches)
5
N/A
6
9.25
5.5
N/A
6.5
9.4375
6
6
7
9.625
6.5
6.5
7.5 – 8
9.875
7
7
8.5
10
7.5
7.5
8.5 – 9
10.125
8
8
9 – 9.5
10.3125
8.5
8.5
9.5 – 10
10.5
9
9
10 – 10.5
10.625
9.5
9.5
10.5 – 11
10.8125
10
10
11 – 11.5
10.9375
10.5
10.5
11.5 – 12
11.125
11
11
12
11.3125
11.5
11.5
N/A
11.5
12
12
N/A
11.625
12.5
12.5
N/A
11.765
13
13
N/A
11.9375
13.5
13.5
N/A
12.16
14
14
N/A
12.25
14.5
14.5
N/A
12.50
ADJUSTMENT GUIDES
Did you receive your new pair of Shammas, but looking for some extra tips on how to get the perfect lace adjustments? Look no further! Below you can find step-by-step written instructions as well as videos for how to lace your sandals!
Elite Lacing System
(Our Elite Lacing System includes Elite Warriors, Elite Chargers, Elite Maximus, Elite Alphas, and Elite Ibex).
1. First, loosen all 3 strap zones until there is excess slack in each section. The straps should be extremely loose in all three zones.
2. Start by centering your foot on the sandal, so that the placement of your foot is in the desired final location (you should have equal room in front of your toes and behind your heel with this placement).
3. Now that your foot is centered on the sandal, adjust the buckle front to back to find a desirable location.
4. Now tighten the insole strap. This will dictate the buckle’s left to right position on your foot. Keep the buckle parallel with the bone behind your big toe. If the buckle is too close to the bone behind your big toe it may be uncomfortable. If this is the case, loosen the insole strap and reposition the buckle farther to the outside of the foot.
5. Now that the buckle is in it’s desired position and the insole strap is tightened, tighten the toe strap until snug and comfortable.
6. Tighten the heel strap to your desired comfort level and enjoy your Shamma Sandals!
Numa Lacing System
(Our Numa Lacing System includes Numa Warriors, Numa Chargers, Numa Maximus, and Numa Alphas).
1. First, loosen the two strap zones (heel strap section and elastic forefoot strap) until there is excess slack in each section. The straps should be extremely loose in both zones.
2. Start by centering your foot on the sandal, so that the placement of your foot is in the desired final location (you should have equal room in front of your toes and behind your heel with this placement).
3. Now that your foot is centered on the sandal, adjust the heel strap to fit comfortably.
4. Now tighten the elastic forefoot strap. This will dictate the buckle’s left to right position on your foot. The buckle will self-adjust so don't worry about placement. Push the elastic through the tension-lock buckle on the heel in order to adjust its tightness. For lifestyle use, you won't need it super tight, it should just be comfortably tight.
5. Make any adjustment on your heel strap if needed and enjoy your Shamma Sandals!
TrailStar Lacing System
(Our TrailStars Lacing System includes TrailStars Maximus, TrailStars Alpha, and TrailStars Omega).
Super Lacing System
(Our Super Lacing System includes Super Browns and Super Goats).
Models in our Super Collections have 3 adjustment zones for the perfect fit- the toe strap, the insole strap, and the heel strap.
1. First, loosen all 3 strap zones until there is excess slack in each section. The straps should be extremely loose in all three zones.
2. Start by centering your foot on the sandal, so that the placement of your foot is in the desired final location (you should have equal room in front of your toes and behind your heel with this placement).
3. Now that your foot is centered on the sandal, adjust the buckle front to back to find a desirable location.
4. Now tighten the insole strap. This will dictate the buckle’s left to right position on your foot. Keep the buckle parallel with the bone behind your big toe. If the buckle is too close to the bone behind your big toe it may be uncomfortable. If this is the case, loosen the insole strap and reposition the buckle farther to the outside of the foot.
5. Now that the buckle is in it’s desired position and the insole strap is tightened, pull any extra slack from the toe strap zone through the outside ankle slot towards the heel.
6. Tighten the heel strap to your desired comfort level and enjoy your Shamma Sandals!
Cruzer Lacing System
Our Cruzers models have 3 adjustment zones for the perfect fit - the toe strap, the insole strap, and the heel strap.
1. Adjust to Desired Fit
After centering your foot on the sandal, adjust the outside lacing so that the buckle is in a comfortable position and there is tension (but not too much) between the toe plug and ankle slot.
2. Pull On Power Sleeve
Adjust the heel strap by pulling up on the power sleeve, to create some space to tighten the heel strap. It should be enough space to grab the slack with two fingers.
3. Pull Slack Through
Pulling from the heel strap side, pull the extra slack through the bottom of the sandal until the Power Sleeve is resting in a snug position.
4. Pull On Power Sleeve
Pulling from the inside lacing side of the Power Sleeve, pull the extra slack through the Power Sleeve until the strap is flush with the sole of the sandal.
5. Adjust To Desired Fit
First, create slack underneath the buckle by creating some tension on the inside lacing side of the buckle. Adjust the lacing until comfortable.
6. Pull Slack Through
Take extra slack and feed it back through the buckle, towards the inside lacing of the sandal. Pull slack until the buckle is flush with the foot.
7. Put Extra in Keeper
To keep the extra slack secure, feed the strap through the keeper and pull until comfortable. You are now ready to explore!
Classic Lacing System
(Our Classic Lacing System includes models: All Browns, All Blacks, and Old Goats.)
For more in-depth Classic Lacing steps, please click HERE.
If you're having trouble finding the perfect fit after following the sizing or lacing guides, or if you have any questions, please Contact Us, we’re happy to help!